Accepted MSOT Student Checklist
Congratulations on being accepted into the Master's in Occupational Therapy program! We are so excited to welcome you to the GMercyU community.
To ensure you’re ready to begin your coursework in June, please complete the following tasks as soon as possible:
Next Steps
1. Log Onto the Self-Service Portal
After your acceptance, you will receive an automated email with your username and password, which will allow you to access the GMercyU Self-Service Portal to pay your acceptance deposit. Please check your spam/junk folder if you don’t receive the email within a couple of days after your acceptance.
In order to hold your place in the program, you will need to submit a $500 non-refundable deposit by the due date given to you by the MSOT department. Detailed instructions on how to submit your deposit are below. If you have any problems logging in, please reach out to IT Help Desk at 215-646-7300, ext 21444.
2. Complete and Submit the FAFSA (optional)
As a graduate student, you may be eligible for Direct Student loans offered from the federal government. If you want to be considered for this specific type of funding, you need to submit the FAFSA (Free Application for Federal Student Aid) to GMercyU. If you have any questions on the financial aid process, please contact the Student Financial Aid Office at financialaid@gmercyu.edu.
3. Get Your Funding/Payment in Place
A Financial Options Guide is emailed to students at the start of each new calendar year (January-February). This guide discusses the process and requirements for covering your tuition costs. All funding must be in place by the start of our summer session (start date early June). Bills are generated after you have registered for your summer courses, (generated around May 31st). Loans can take two to four weeks to be processed, so please do not delay if applying for loans. Please contact the Student Billing Office with any questions at studentbilling@gmercyu.edu.
4. Submit Emergency Contact Information
Instructions on how to submit Emergency Contact information were attached with your acceptance email. Please refer to these instructions to complete this step.
5. Obtain Your Student ID Card
Please email a “headshot” from your GMercyU email address to idcardpicture@gmercyu.edu. The image should be a clear picture of your face and neck. Please choose the highest resolution possible when emailing it and make sure it is in a png or jpeg file. Your ID should be available for pick up at Orientation (held the week before summer session) as long as you have already submitted your photo.
6. Register for a Parking Pass
Per University policy, all vehicles on campus must be registered with Public Safety and issued an official parking permit every year. Students who begin their program of study in the Summer will receive a complimentary parking pass that expires in August. Please register your vehicle here. Vehicle registration must be completed to receive your complimentary Summer pass. You will receive your Summer parking pass at Orientation the week before classes begin.
You will need to purchase a parking pass for the new academic year starting in the Fall semester. A University email will be sent to all students with how to register your vehicle and pay for your permit for your parking pass. Anyone who cannot register online should call Campbell Solution Center (CSC) to make alternate arrangements to register your vehicle. If you have any questions, please contact Campbell Solution Center (CSC) directly at 215-646-7300 X21595.
Contact Us
If you have specific questions, concerns, or need help completing one or more of the tasks listed above, contact information is listed below.
|
Topic |
Point of Contact |
Email Address |
Phone Number |
|
General questions about the MSOT program |
Kathy Hosack, Administrative Assistant |
215-646-7300 ext. 21699 |
|
|
Financial Aid, Loans, and FAFSA |
Student Financial Aid Office |
215-646-7300 ext. 21216 |
|
|
Class Registration |
Dr. Thomas Mernar, OT Program Director |
215-542-4659 |
|
|
Tuition, Fees, Payments, and Payment Plans |
Student Billing Office |
215-646-7300 ext. 21278 |
|
|
Parking Passes |
Campbell Solution Center |
215-646-7300 ext. 21595 |
How to Pay Your Deposit on Self-Service
1. Once you log in to Self-Service using the credential provided to you via email, click on the Student Finance tab. This is where you will be able to pay your deposit online.

2. The next screen will show an Account Summary. You will notice that the balances are all set at $0.00 —that is normal! You will not see actual balances until the first billing statement is sent out. All you need to do is click the “Make a Deposit” link on the right side of the screen.

3. After you click the link, you will be redirected to our secure payment site—Touchnet—which will look like this:
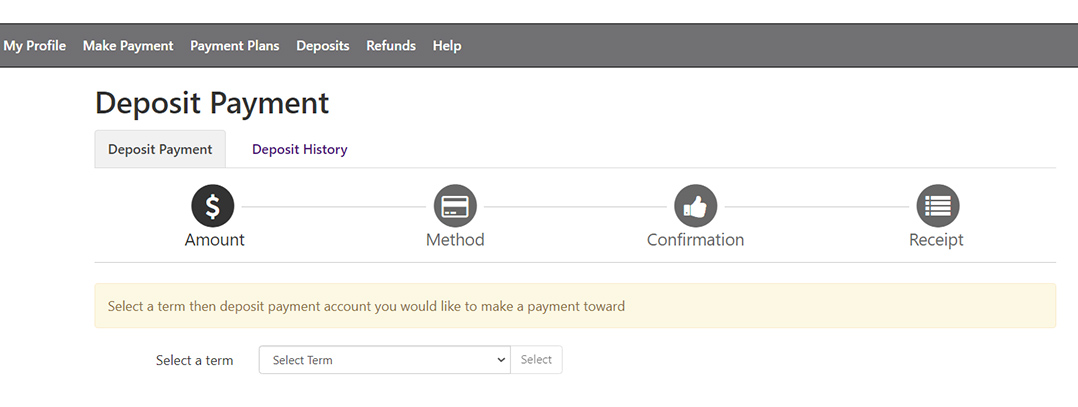
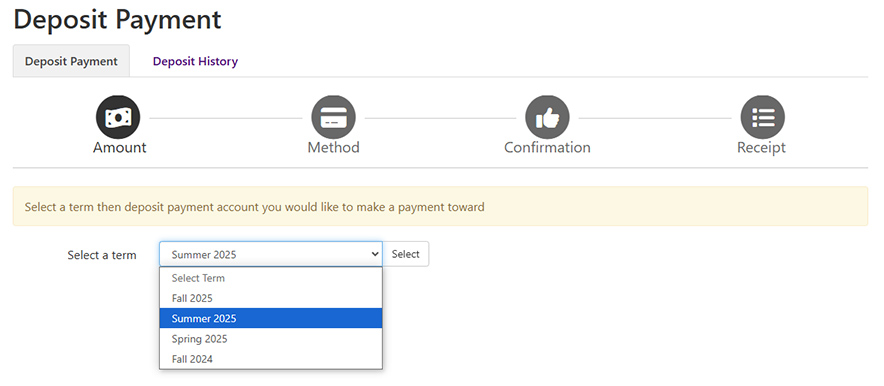
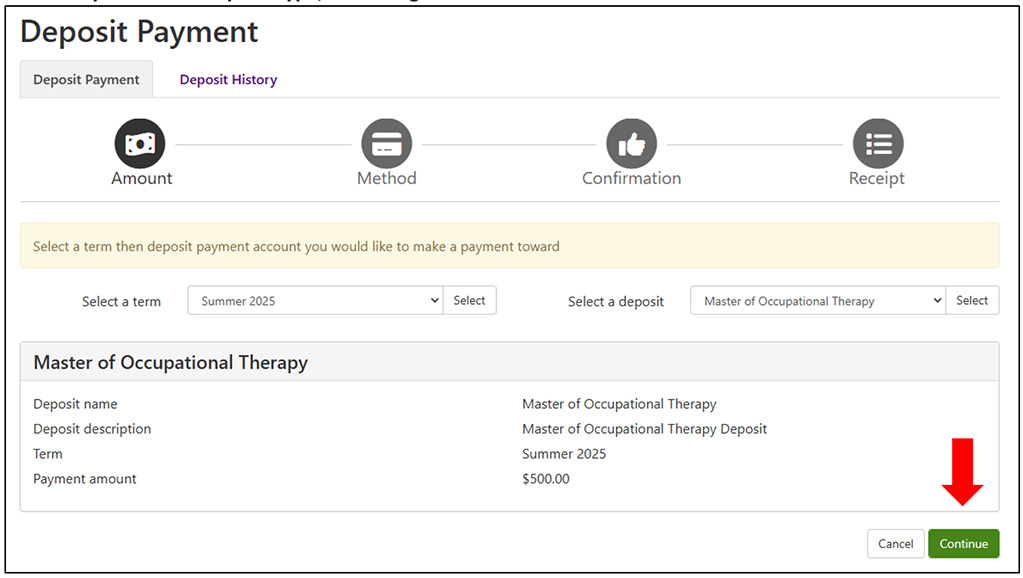
4. At the bottom of the screen, select the term you want to pay from the drop-down menu. You will be selecting Summer term (Summer 2025). Then hit the “Select” button.
5. Next, select “Master of Occupational Therapy” from the next drop-down menu and hit “Select”. **PLEASE NOTE** Occupational Therapy Deposit is $500.00. If you do not have a $500.00 deposit, please re-select to get to the correct deposit and amount.
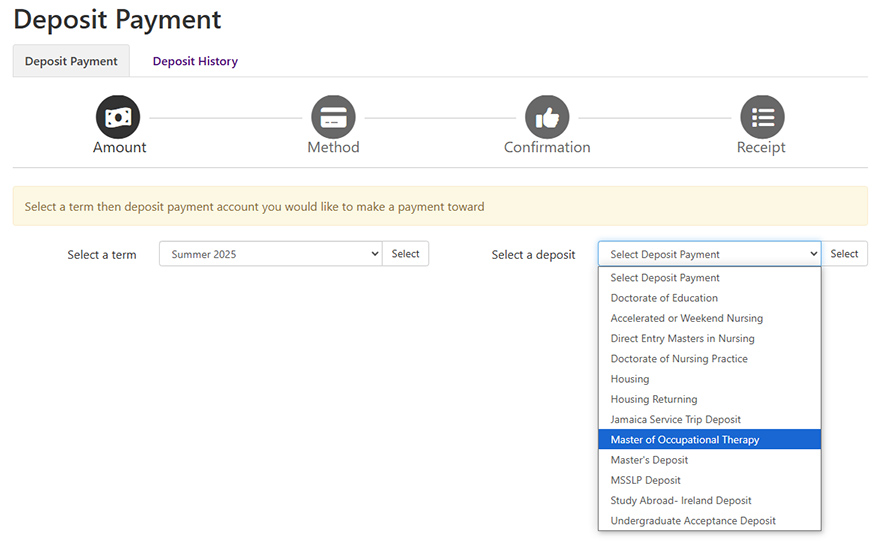
6. Once you select a deposit type, click the green “Continue” button to move forward.
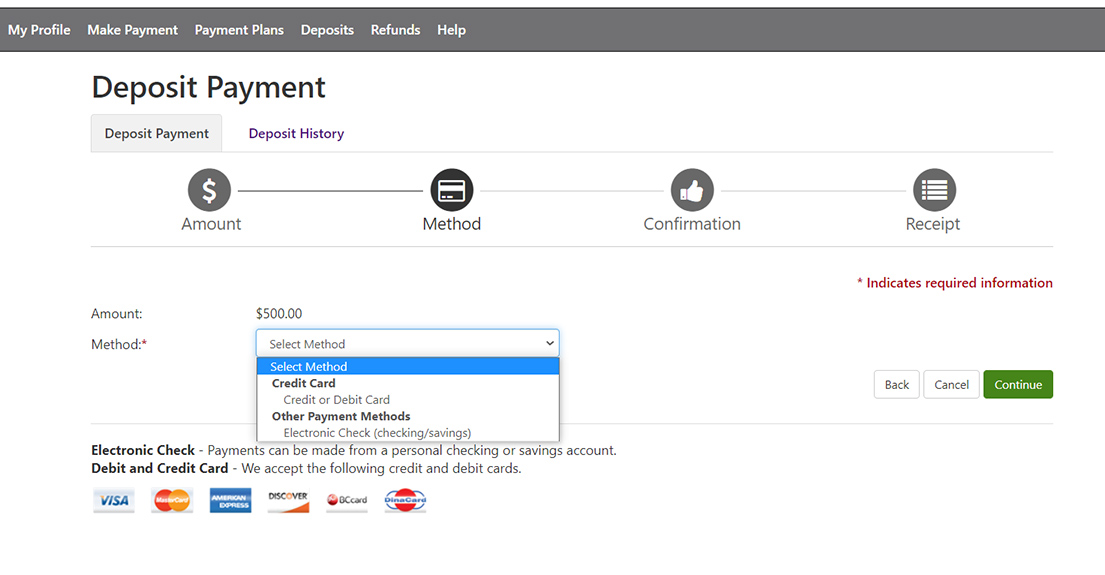
7. On the next screen, you’ll be instructed to select a payment method. The deposits can be paid either by Electronic Check from your bank account or Credit Card.
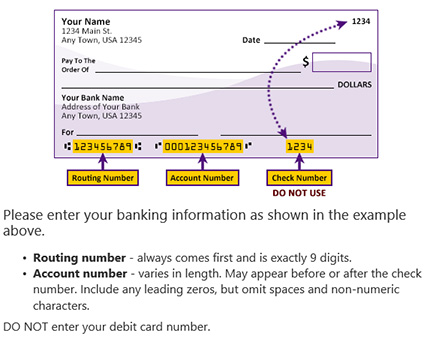
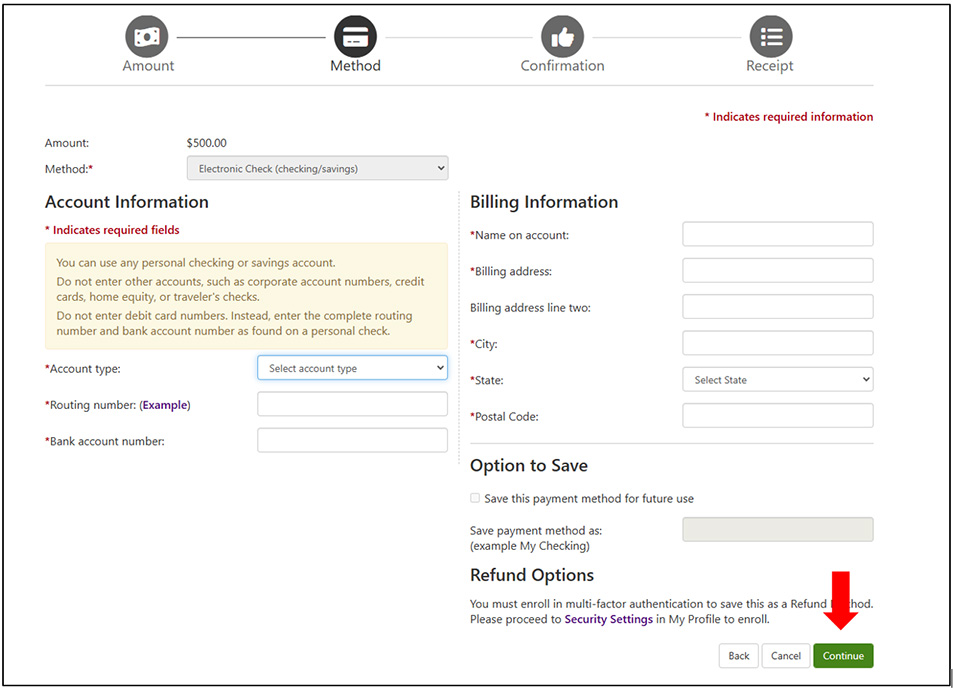
8. If paying by electronic check, you need to select the Account Type (Checking or Savings) and have both the Routing Number and Bank Account Number on hand—both of these can be found on the bottom of a check. Complete the form by adding your billing information, then click “Continue” to move to the confirmation page.
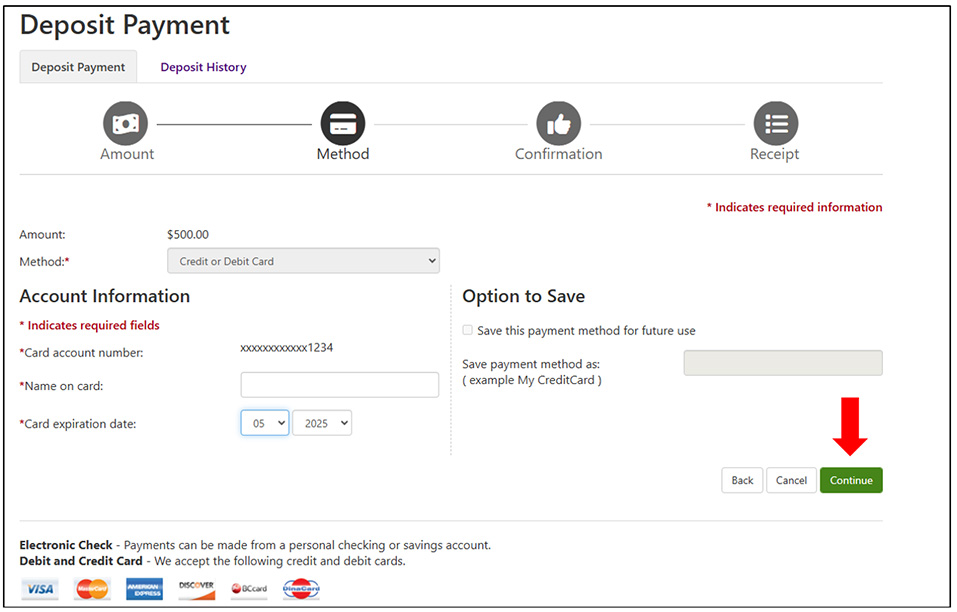
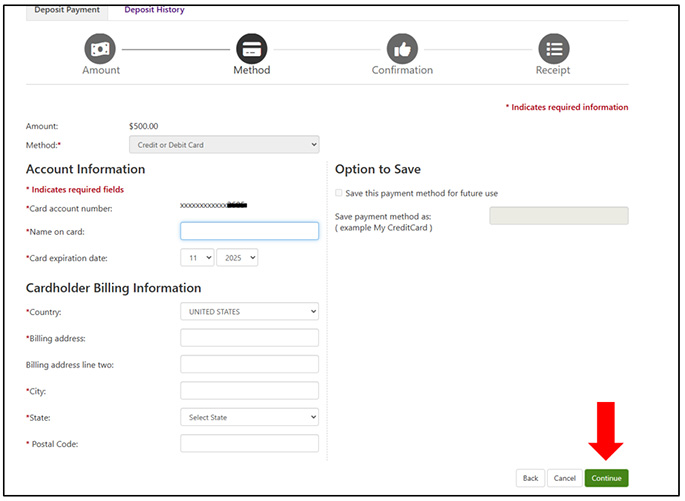
9. If paying by credit or debit card, put in the card number, then click the green “Continue” button. On the next page, you’ll be asked to provide additional information about the card as well as a billing address. When you finish adding this information, click “Continue” to move to the confirmation page.
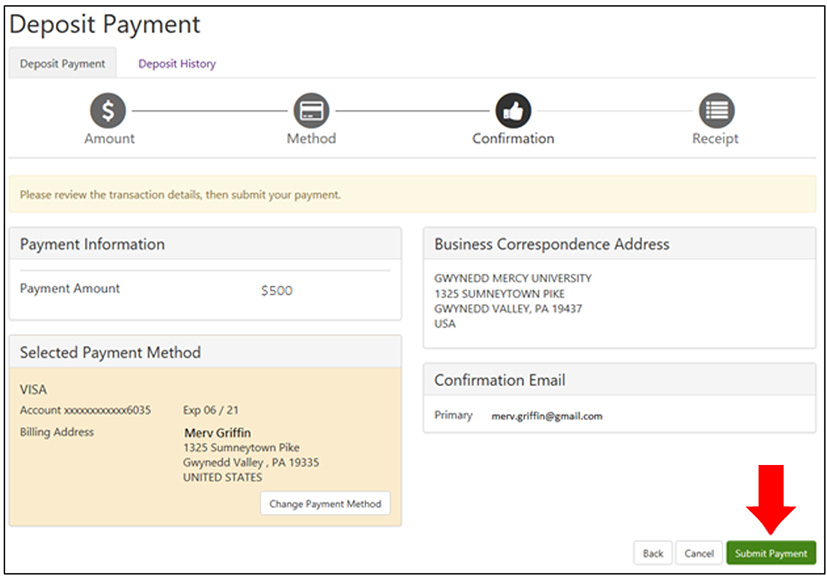
10. The last thing you need to do is review your payment information and click the “Submit” button at the bottom of the screen. Please note that a confirmation email will automatically be sent to the personal email account that we have on file for you — so make sure to check your junk or spam folders for it.
